This is one of my favorite exercises. I use it often both to evaluate and develop the horse and rider. It asks for several basic skills and it can be tailored to fit almost any skill set or level of ability.

How to:
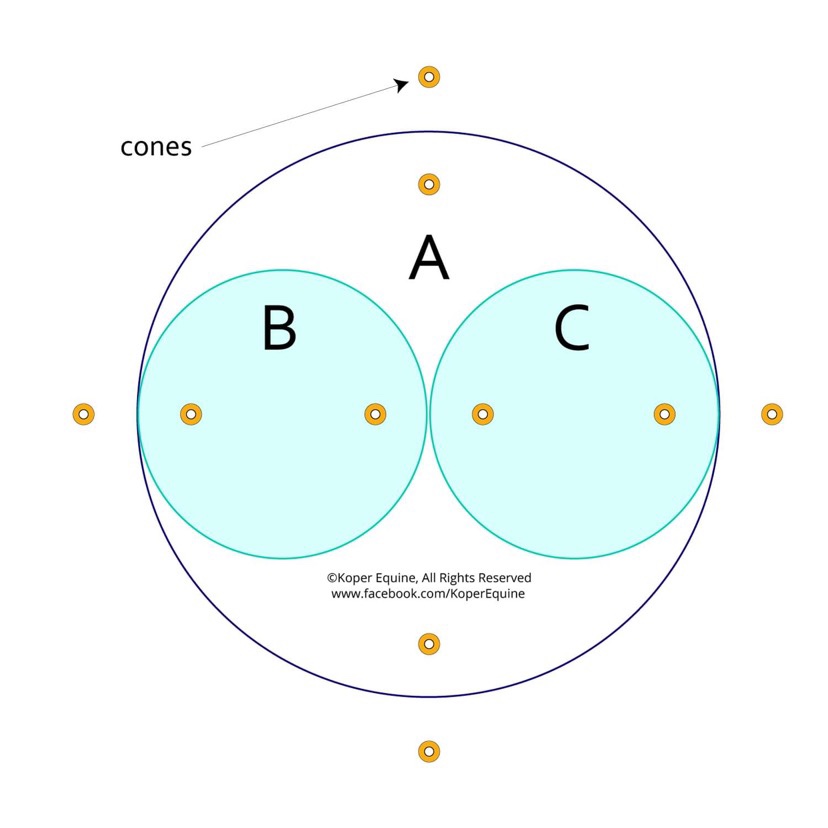
Ride circle A 3x to establish your line, rhythm, pace and work area. If you consider that successful try riding circle A, circle B, circle A, circle C repeat 3x.
Why:
1. Repeating an exercise 3x allows the horse to understand, anticipate and adapt it’s technique and helps develop consistency and attention span.
2. Changing from one line/circle to another alleviates pressure and keeps the horse listening and alert to upcoming changes.
3. Challenge and develop your ability to establish your line, pace and rhythm.
4. Challenge your horse to listen and respond accurately to your seat and leg.
5. Challenge your horse to control its shoulders from one line to another. Each change will cause your horse to check its own balance and weight control to adjust its shoulders to the new line.
6. Turning onto the inside circles helps to develop the placement and use of the inside hind leg.
7. Turning back onto the bigger circle reconnects the horse with its outside hind and your outside aids.
8. Ready for more? Add 2 poles to challenge your horse’s ability to maintain its rhythm and line while navigating an obstacle.

Tips:
1. Set out cones to mark each 1/4 of the circle for an accurate shape.
2. Count your strides between each cone. This will help establish your rhythm and tell you if each 1/4 matches the rest.
Modifications:
1. Circle sizes size can vary to suit your horse. Circle A might be 20m, 30m, 40m while circles B&C could be a challenge at 10m, 12m, 15m, 20m, depending on gait, training and current level of ability.
2. Ride or lunge.
3. Develop in all 3 gaits, add transitions, changes within gaits, lateral work, poles or small jumps.
4. Try using it as an active walk warm up on a long rein to get them listening to your seat. A 15 minute walk prior to any other warm up has been shown to significantly decrease lower leg injuries.
5. Transition from one side to the other through a spiral shape.
6. Build it out into a larger, more complex version like in the picture below.

When riding an exercise like this, doing bodywork or practicing an in-hand exercise designed to improve your horse’s mechanics, it’s helpful to remember to trust the work. You might see some benefits today and even more in a few weeks as the horse develops. If you keep working at it, one step after another, you will move forward and get better. Understand the intentions of the work, the basics of the mechanics and trust that if you’re honest and calm in your attempts, at some point in the near future you’ll reap the benefits.
Leave a Reply